
If both your transmitter(s) and receiver(s) are powered up and you rub the microphone port on the transmitter with your finger you should hear a noisy rubbing sound in your ears. If you do not hear the noisy rub in your ears try pairing the transmitter to the receivers.
Press the ‘Connect’ ![]() button on the transmitter and hold it close to the receiver (within 10cm / 4 inch).
button on the transmitter and hold it close to the receiver (within 10cm / 4 inch).
Roger Pen / Select / Table Mic – After a couple of seconds the light on the transmitter will turn solid green for a couple of seconds before returning to a slow flashing green light.
Roger On – Check the feedback in the display of the screen. A tick indicates a successful pairing, a cross indicates an incompatible receiver, a question mark indicates receiver not found, go closer.
Repeat for each receiver you wish to pair.
Sometimes a bluetooth or wifi connection in close proximity to the transmitter and receivers you are trying to pair will interfere with the bonding process, try moving away from any sources that might be causing the problem, such as a bluetooth mobile phone or wifi router.
It is quite easy to think you have turned your Roger device off and not realise that you have muted it instead, or that it actually isn’t turned off at all and still actively working and discharging its internal battery. We recommend regardless that on day of use you put your Roger device on charge first thing so it will be there for you when you need it!
N.B. charging your transmitter from the USB port of a computer doesn’t give the best charge, the best quality and most robust way to charge your transmitter is directly via a wall socket.
To unpair all transmitters and receivers from your lead transmitter press and keep holding the ‘Connect’ ![]() key for around 10 seconds, then all transmitters and receivers paired will be disconnected.
key for around 10 seconds, then all transmitters and receivers paired will be disconnected.
With Touchscreen Mic scroll through the menus and click ‘Disconnect’ ![]() for an individual device or ‘NewNet’
for an individual device or ‘NewNet’ ![]() which will disconnect all transmitters and receivers from the Touchscreen Mic, then re-connect the device(s) via the ‘Connect’ icon
which will disconnect all transmitters and receivers from the Touchscreen Mic, then re-connect the device(s) via the ‘Connect’ icon ![]()
Make sure to re-pair your transmitter again to your receivers and other transmitters once you have done this!
Roger On = press the centre function button and the connect pairing button together for about 10 seconds.
Roger Pen = press the on/off, the microphone, the accept and the decline call buttons all at the same time and hold for about 10 seconds.
Roger Pen IN = press the on/off and the microphone buttons all at the same time and hold for about 10 seconds.
Roger Select, Table Mic and Clip-on Mic = press the on/off and the connect buttons at the same time and hold for about 10 seconds.
Roger Select IN = press the on/off button for 10 seconds at the same time as inserting the tip of a paperclip into the reset pinhole on the underside of the device.
Roger Inspiro = press the four side buttons simultaneously and hold for 10 seconds.
Roger Touchscreen Mic, Pass-around Mic and MultiMedia Hub = press and hold on/off and mute buttons simultaneously for 10 seconds and the device re-starts. This will also remove the passcode set on Quick Menu of a TSM if enabled.
If Roger Select freezes and becomes unresponsive to button presses, then press and hold on/off and bluetooth button for 10 seconds. This action will not delete pairings to other devices but simply restart the device.
Roger 3 transmitters hold unlimited receivers ready to transfer receiver licences (and functionality) into compatible hearing instruments, in the main that is Phonak and Unitron branded products.
Roger On 3 – Press and hold the Function and Connect button together for 2 seconds, turn the hearing instrument on and place close. Turn hearing instrument off and repeat with second instrument if applicable.
Roger Table Mic 3 and Roger Select 3 – Press and hold the Power and Connect button together for 2 seconds, turn the hearing instrument on and place close. Turn hearing instrument off and repeat with second instrument if applicable.
Roger Touchscreen Mic 3 – Select RogerDirect icon in the menu, turn the hearing instrument on and place close. Turn hearing instrument off and repeat with second instrument if applicable.
To adjust the gain (volume) being sent from Roger On to your hearing instruments – press and hold the Function button until you see a V on the screen. Then cycle through to your preference, this can be set to more or less voulume if required.
To adjust the gain (volume) being sent from Roger On to your hearing instruments – press and hold the Function button until you see a V on the screen. Then cycle through to your preference, this can be set to more or less volume if required.
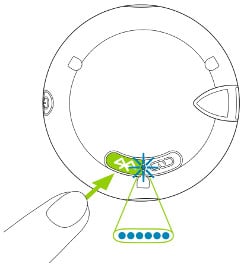 For Roger Select press and hold the bluetooth button on the underside of the device, this turns bluetooth on, then a quick press of the bluetooth button sets it into pairing mode with a rapidly flashing blue light.
For Roger Pen press and hold the ‘Accept’ button until the device starts flashing rapidly blue. It is in pairing mode.
Then go into your phone menu and bluetooth settings, search for the transmitter, select it and accept the pairing.
To delete a bluetooth pairing, go into the Bluetooth menu on the mobile phone you want to disconnect, find your device and select “forget device”.
Then, to delete all bluetooth pairings from the Roger Pen, press and hold the Accept, Decline and Connect button on the Pen for about 10 seconds until the indicator light turns orange.
To delete all pairings from the Roger Select, press and hold the Connect and the bluetooth button on the underside of the device for about 10 seconds until the indicator light turns orange.
To enable bluetooth on the Roger Pen, press and hold the Accept phone button for 2 seconds until you see a blue light, to disable bluetooth on the Roger Pen, press and hold the Decline phone button on the Pen until the indicator light goes blue then fades off.
To enable bluetooth on the Roger Select, press and hold the bluetooth button for 2 seconds until you see a blue light, to disable bluetooth on the Roger Select, press and hold the bluetooth button until the indicator light goes blue then fades off.
Using bluetooth with your Roger transmitter will deplete its battery far more quickly than if not using bluetooth. We recommend turning off bluetooth on the Roger transmitter when not required.
You need to turn off the bluetooth on the Roger transmitter before switching the device off, otherwise it will still be connected via bluetooth and actively draining the battery.
Phonak Roger Select and Roger Pen will pair with up to 8 devices. If you try to pair with an extra device once you have reached the limit the oldest paired device will be deleted in favour of the newest. Also a maximum of 2 mobile phones at one time, if you try to pair a third mobile phone the first paired phone will drop off.
Bluetooth standards are notoriously variable from phone to phone and not all features will work with all mobile phones. Try pairing the transmitter with other mobile phones and see if the issue persists.
Try altering the volume control situated at the side of the device. There is a ‘+’ and a ‘-‘ button down the side for you to make adjustments and you may have accidentally turned the device too low.
 Phonak Roger is a technology that has been designed as a communications tool, an enhancement to the benefit provided by hearing aids.
Phonak Roger can easily be connected to most audio devices to offer a high quality audio, for instance to listen easily to audio from a TV, a hifi or a PC / laptop.
With a little extra equipment called a phone adapter Phonak Roger can also easily connect to a deskphone with a corded handset or a corded headset to enable calls in the most challenging of environments.
If you are regularly communicating with your work colleagues or customers via Zoom or Microsoft Teams etc, we have some additional equipment that will make this type of communication fantastically easy, even in a very noisy environment.
When this equipment is set up you pick up the handset of your corded deskphone as usual to make or take a call with one important difference; the audio from the telephone is wirelessly transmitted directly into both your hearing aids at the same time, resulting in vastly improved audibility of telephone conversations – phone calls will be VERY clear!
 Setting up the telephone adapter to work with your Phonak Roger equipment is very easy.
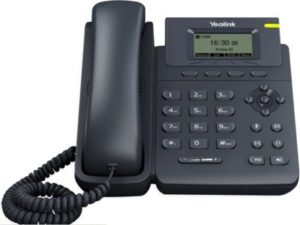
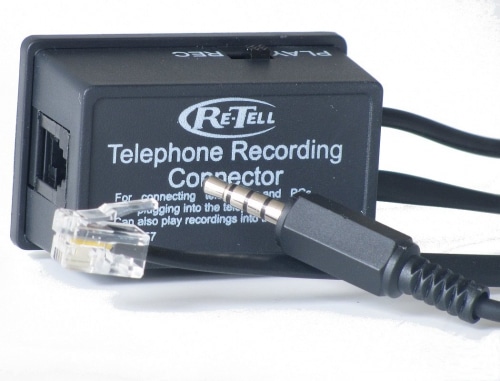
1). The curly cord of the handset of your desk phone plugs into the base of your desk phone itself via an oblong (usually transparent) RJ11 plug. Remove this plug and push it into the same type of socket in the phone adapter. (There is only one spare socket available).
2). From the opposite end of the phone adapter you will have two cables, one will have the same type of oblong transparent plug at the end of it and the other will have a 3.5mm audio jack (like a headset jack). Push the spare oblong transparent plug into the base of your desk phone where the curly cord was plugged in originally.
3). You now have the phone adapter in serial from the curly cord handset to the base of your desk phone with a 3.5mm jack cable running off the adapter. Plug the 3.5mm jack into the audio port of your Roger docking station. N.B. The switch on the side of the telephone adapter usually needs to be set to ‘REC’ as opposed to ‘PLAY’. If ‘REC’ does not work then try ‘PLAY’.
4). Make sure you power your Roger docking station via a wall socket (as opposed to a USB port on your PC) and place your Roger transmitter (usually Roger On, Roger Pen or Roger Select) into the charging slot of the docking station ready to take a call. Make sure your Roger transmitter is sitting firmly on the contact in the docking station.
As soon as your Roger transmitter detects a dial tone when you make or take a call the audio from the phone will transmit directly into your hearing aids. N.B. If you notice any delays in connection when lifting the handset of the phone try removing the mains supply from the docking station, power is not required for it to work.
Often, using a headset in the workplace is problematic on a number of fronts.
- With hearing loss it can be difficult to hear calls using a headset
- There can be lots of whistling (feedback)when wearing a headset
- Wearing a headset over the top of a hearing aid can lead to discomfort, particularly if worn over a number of hours.
Our solution overcomes all these issues with ease.
When this equipment is set up you wear your existing headset around your neck as opposed to on your head. The microphone of the headset sits in the same place in front of your mouth so the person at the other end of the line hears you just the same. The earpiece of the headset becomes redundant.
The phone adapter sits in serial on the curly cord of the headset and splits the audio from the call off into Roger, which transmits the call audio directly into your ears. Your hearing aids take care of the type and level of hearing loss.
It’s a VERY efficient way to hear calls – phone calls can’t get any clearer and you have the added bonus of no discomfort as you are not squashing your hearing aid into your ear with the pressure of the headset against the side of your head.
Setting up the telephone adapter to work with your Phonak Roger equipment is very easy.
1). The curly cord of the headset of your desk phone plugs into the base of your desk phone itself (or turret) via an oblong (usually transparent) RJ9 plug. Remove this plug and push it into the same type of socket in the phone adapter. (There is only one spare socket available).
2). From the opposite end of the phone adapter you will have two cables, one will have the same type of oblong transparent plug at the end of it and the other will have a 3.5mm audio jack (like a headset jack). Push the spare oblong transparent plug into the base of your desk phone (or turret) where the curly cord was plugged in originally.
3). You now have the phone adapter in serial from the curly cord headset to the base of your desk phone with a 3.5mm jack cable running off the adapter. Plug the 3.5mm jack into the audio port of your Roger docking station. N.B. There is a switch on the side of the telephone adapter, you will need to experiment with which setting works with your telephony. If you select ‘REC’ and that does not work then try ‘PLAY’.
4). Make sure you power your Roger docking station via a wall socket (as opposed to a USB port on your PC) and place your Roger transmitter (usually Roger On, Roger Pen or Roger Select) into the charging slot of the docking station ready to take a call. Make sure your Roger transmitter is sitting firmly on the contact in the docking station.
As soon as your Roger transmitter detects a dial tone when you make or take a call the audio from the phone will transmit directly into your hearing aids. N.B. If you notice any delays in connection when lifting the handset of the phone try removing the mains supply from the docking station, power is not required for it to work.
- Discomfort (the headset earpiece presses your hearing aid against your head)
- Lack of audio quality (you can’t hear your caller clearly or at all)
- Whistling (feedback)
- Handling (difficulty lining up the headset earpiece to the microphone on your hearing aid)
Our USB Conversion to Headset Pack deals with all three issues, and it offers excellent call quality – even in very noisy environments.
It is very much a ‘plug and play’ solution, you simply plug our kit into the USB port of your laptop / PC (does not work with Mac unfortunately).
Your VOIP software should automatically default to our headset. Then when you make or take a call your caller will hear you very clearly, and you will hear them very clearly too.
Their voice will be transmitted directly into BOTH your ears and your hearing aids will take care of the type and level of hearing loss you have. Calls can’t get any clearer than this method, it is very efficient, much more so than simple amplification.
Effectively your hearing aids become a high quality pair of wireless earpieces matched to your hearing loss.
If in the unlikely event our kit does not work straight out of the box please ask us how to adjust the settings on your software.
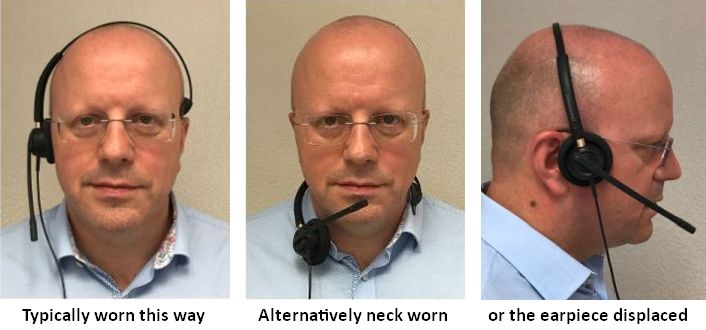
It is important from a comfort point of view to wear the headset one of two ways and slightly differently than you might ordinarily if you were not wearing hearing aids, see the image below;
An alternative to the Headset Pack is to use the supplied USB-A to USB-C charging cable provided with Roger On. You can plug this cable into the USB-A port of your laptop and the USB-C port of the Roger On, then clip the Roger On to your lapel. This enables two way audio on Teams and Zoom calls without a headset and is called ‘Headset Mode’.
Practically it works quite well in quieter environments and for light use, but is less of an option when required for heavy workplace use and in moderate to noisy rooms, this is when the Headset Pack really comes into its own.
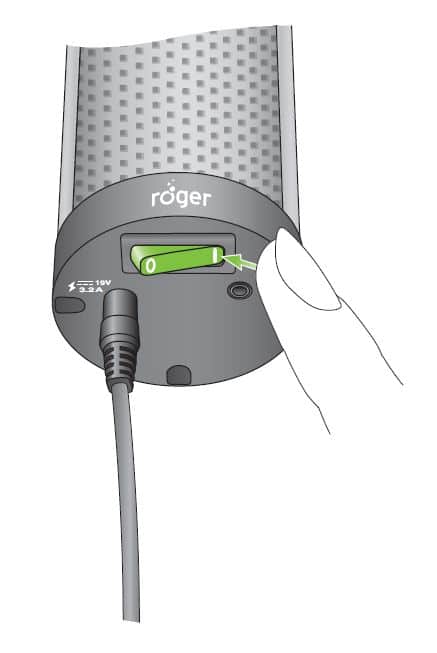 No power – DigiMaster is mains powered, make sure it’s plugged into the mains and switched on at the wall socket, also that the DigiMaster unit itself is switched on – it has a switch on the underside near to where the power cord plugs into the speaker unit itself.
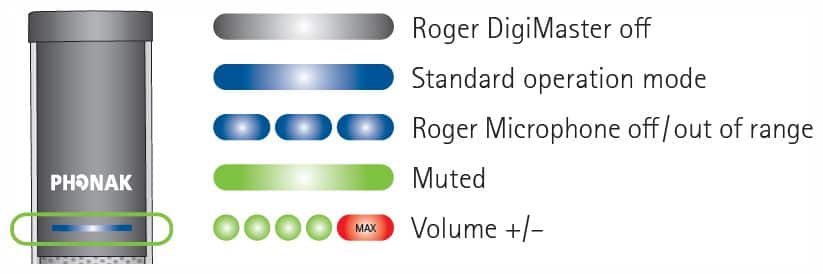
What does the DigiMaster indicator light signify – the LED indicator light shows what is happening with the DigiMaster speaker
How do I pair the Roger transmitters to the DigiMaster – In this order, hold the Touchscreen Mic near to the DigiMaster (within 10cm) and pair the TSM to the DM via its settings screen. Then pair the TSM to the Roger Neckloops, and then pair the TSM to the Pass-Around Mics and MultiMedia Hub. NB. when pairing the TSM to another device make sure all other devices are turned off or at least a good distance away to avoid pairing the TSM to the wrong device each time.
How do I pair a mobile phone directly to DigiMaster – Short press the bluetooth button on the DigiMaster. DigiMaster indicator light will flash blue rapidly for 60 seconds while in pairing mode. Search for DigiMaster in your phone’s bluetooth settings. Once paired DigiMaster will blink blue twice.
How can I connect audio wired and wirelessly to DigiMaster – You can connect wirelessly via a bluetooth connection of a mobile phone or tablet, you can connect MutiMedia Hub to any audio device via cable and it will send audio wirelessly to DigiMaster.
You can also use a 3.5mm to 3.5mm cable to connect a device to DigiMaster via the audio input port on DigiMaster.
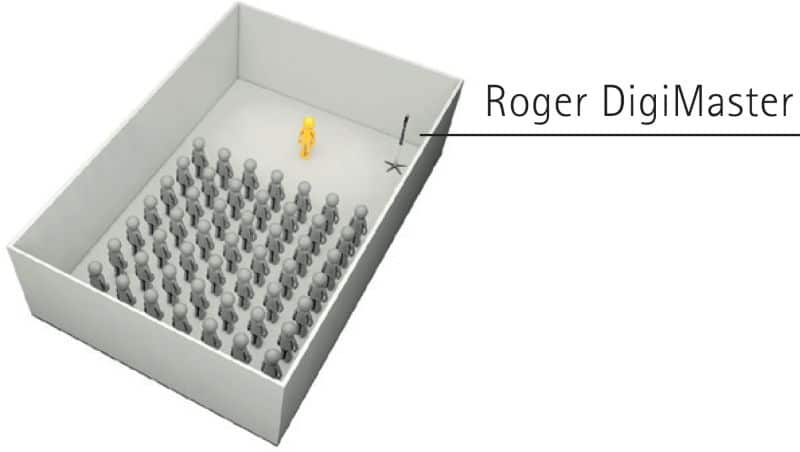 Where should the DigiMaster speaker ideally be situated in the room – As per the image DigiMaster is best situated in the corner of the room (next to a power outlet) and facing outward towards the room and the delegates.
Can I connect my Roger On and 03 equipment to the DigiMaster speaker? If you want to connect your Roger 03 band equipment to a system that includes a DigiMaster speaker then use your media cable (3.5mm to USB-C cable) to connect the audio output socket of the DigiMaster to the Roger On transmitter. Any audio being transmitted to the DigiMaster will feed through to the Roger On and from there on to any Roger 03 band receivers.
I still can’t see how to resolve my problem.
 For a wide selection of helpful Phonak Roger troubleshooting video clips and lots of other Phonak Roger related support videos please go direct to our YouTube Channel
Make sure when you get there to remember to click the ![]() subscribe button so you have easy ongoing access to the videos for future use. We are constantly adding to the channel so check back regularly!
subscribe button so you have easy ongoing access to the videos for future use. We are constantly adding to the channel so check back regularly!
 For Phonak’s own information resources please click here.
You can find lots of useful information and documents including datasheets, online copies of brochures, quick guides and full user guides etc on the full range of Phonak Roger and other wireless products from their extensive portfolio.
If the troubleshooting solutions above (including our helpful and extensive YouTube clips and Phonak’s own help resources) are not resolving your issue just email us via our contact page giving us an initial brief overview of your issue and we will email you back either with some suggestions or a request for clarification so we can help you further.